Ingredientes
-
- 1 lata de Creme de Leite NESTLÉ®
- 1 tablete de NESTLÉ CLASSIC® Meio Amargo picado
- 3 claras
- 3 colheres (sopa) de açúcar
- queça em banho-maria o Creme de Leite NESTLÉ®. Junte o Chocolate e mexa até que fique completamente dissolvido. Reserve. Bata as claras em neve firme. Adicione aos poucos o açúcar. Misture levemente ao creme de chocolate. Coloque em taças e leve à geladeira por cerca de 3 horas. Decore com cerejas, chantilly ou raspas de chocolate.
- Congelamento:
- Congele a mousse de Chocolate, colocando-a em taças que resistam ao congelamento. Deixe por até 3 meses em freezer ou duplex. Para descongelar, deixe em geladeira com cerca de 4 horas de antecedência.
domingo, 27 de fevereiro de 2011
mousse de chocolate
ilust.lampada 3d

Download Source Files
- Source files for this tutorial are available to Premium members.
Get a Premium Membership
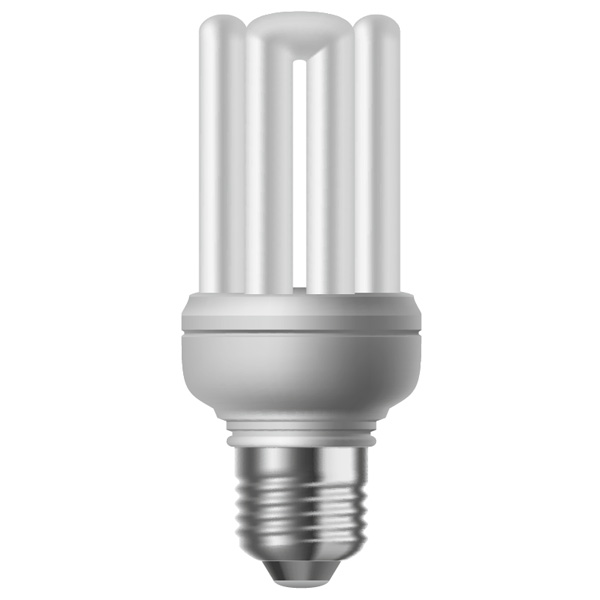
Final Image Preview
Below is the final image we will be working towards. Want access to the full Vector Source files and downloadable copies of every tutorial, including this one? Join Vector Plus for just 9$ a month.Tutorial Details
- Program: Adobe Illustrator CS3
- Difficulty: Intermediate to Advanced
- Estimated Completion Time: 3-5 hours
Step 1
As the first step you will need a shape of an energy saving bulb to start with. Either you pick a good photograph or you make one on your own in vector graphics as shown here. Here we draw our bulb with the Pen Tool, easy as can be.
Step 2
Now you start making the first glowing rod by placing a rectangle as broad as the rod could be.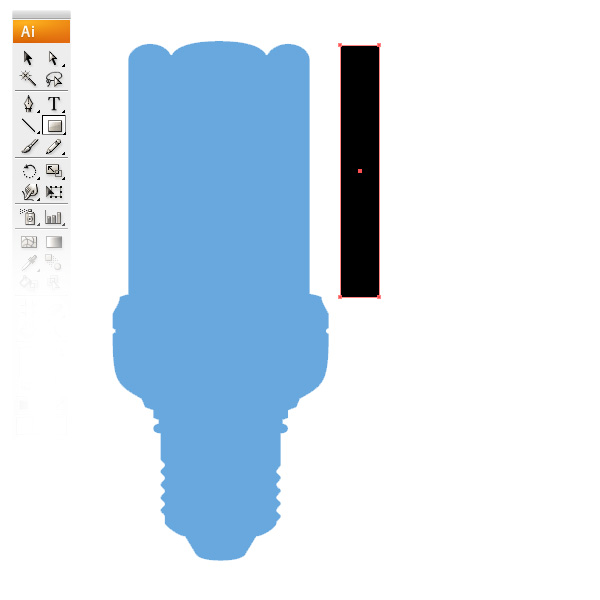
Step 3
Now divide the rectangle into four parts by using the Mesh Tool (shown in the toolbar). It’s important that you don’t click in the rectangle, but at the edge on the left or right side of the vertical center of the rectangle.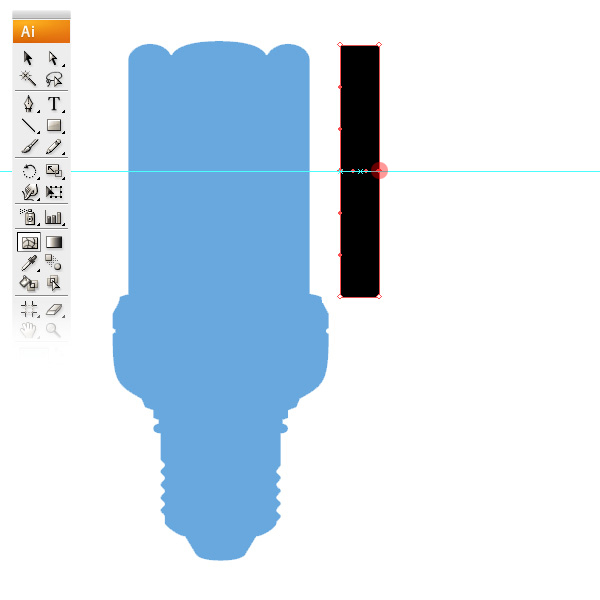
Step 4
As you see here, you have to repeat Step 3 two more times to have it divided into all four parts.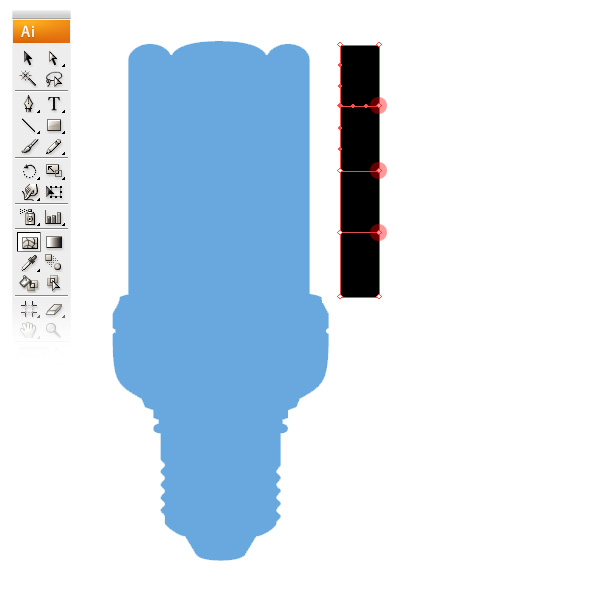
Step 5
Grab the Direct Selection Tool (A), and use it to select the top 6 anchors of your rod, then rotate these by 90 degrees.
Step 6
Select the outer four anchors of the rotated part and rotate these again by 90 degrees to create an arch.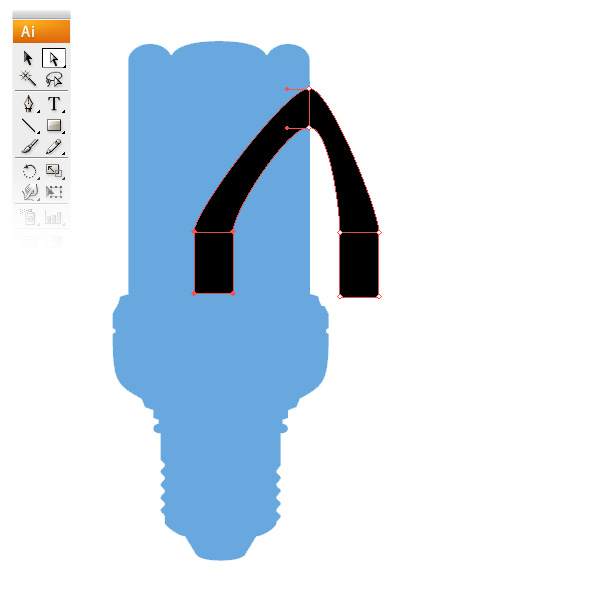
Step 7
Hide your rod for a moment and draw in four guidelines as shown below. This will help you to position your mesh.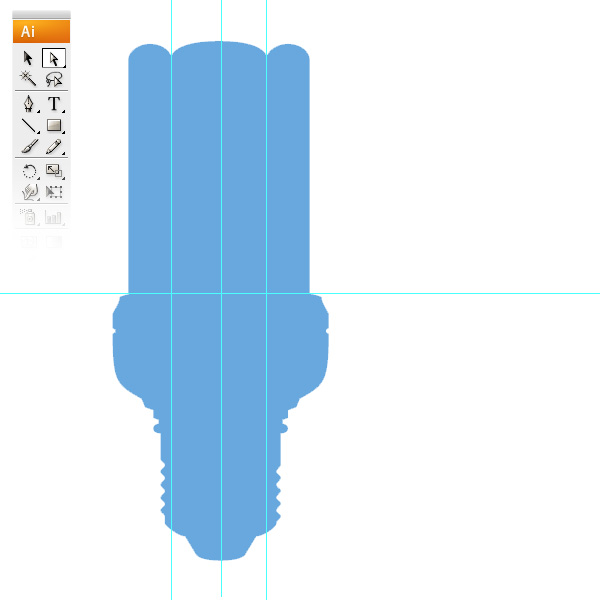
Step 8
Place the rod as shown below and between the guidelines. Make sure you drag the rod parts by the anchors to align them at the guidelines by having the magnetic guidelines active.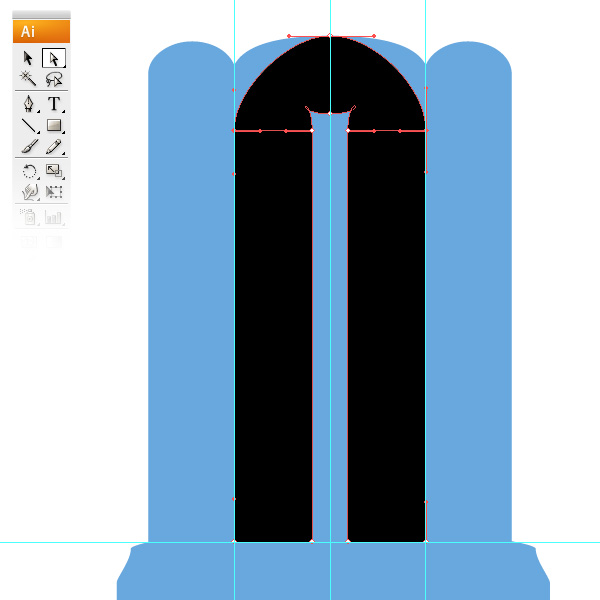
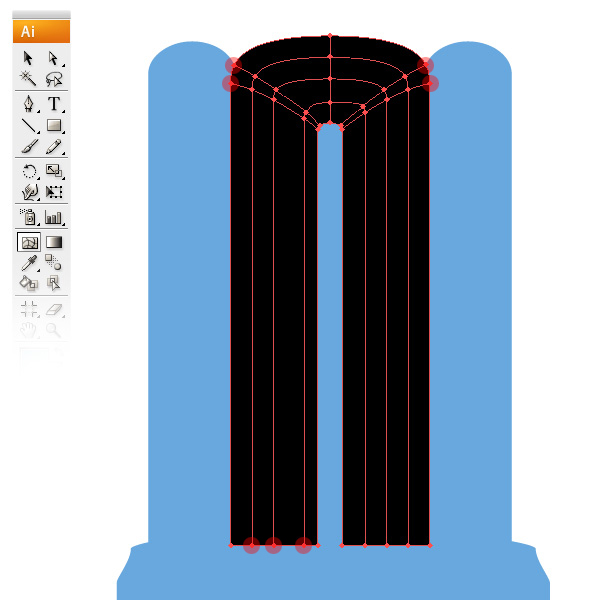
Step 9
Now this part is going to get tricky. The shape for our first part is ready and now you have to place further mesh anchors, so later on you can colorize it to get a gradient effect into your rod.Place the anchors of the mesh by clicking with the Mesh Tool at the bottom edges to get vertical divisions. Also add another two diagonal divisions in the curve as you can see below. This helps to give a more detailed look to the mesh gradient.
Step 10
Now let’s build one of the side rods, which we can later just copy for the other side. Place a rectangle and divide it into three parts like in the picture below. Notice that the main rod in the center is located a bit in the front, so you have to scale this rod a bit up (big red marker).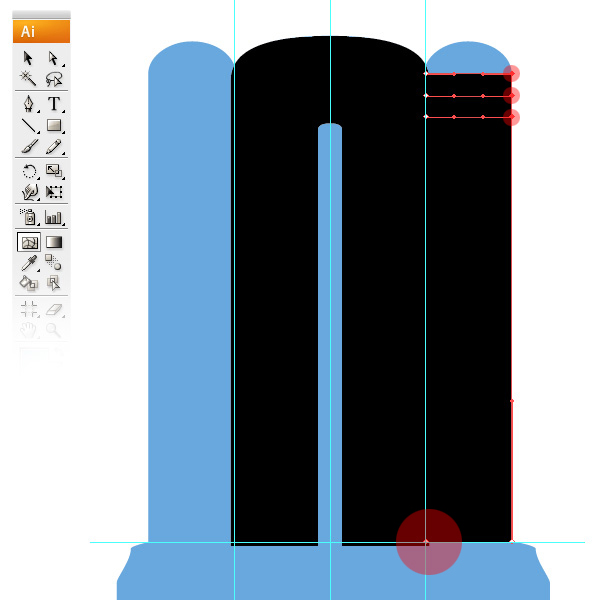
Step 11
Form the shape to conform your rectangle to the shape of your bulb and divide it again with the Mesh Tool.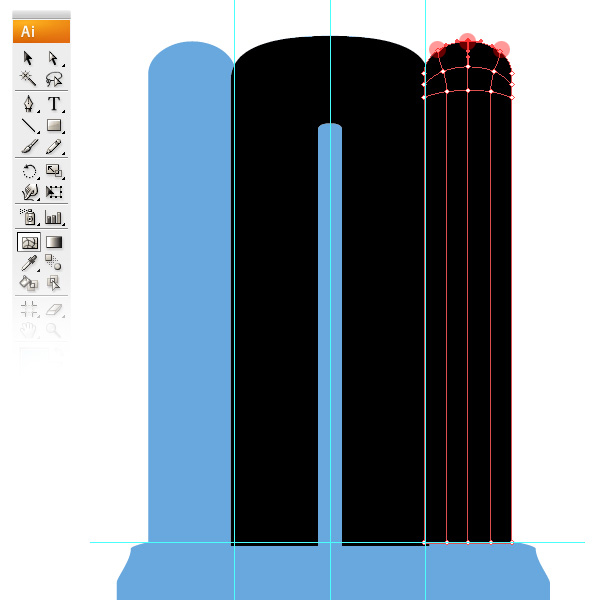
Step 12
Now you’re good to go for colorizing your rods to have a smooth light effect. Select an anchor and then you just pick the color in your color palette.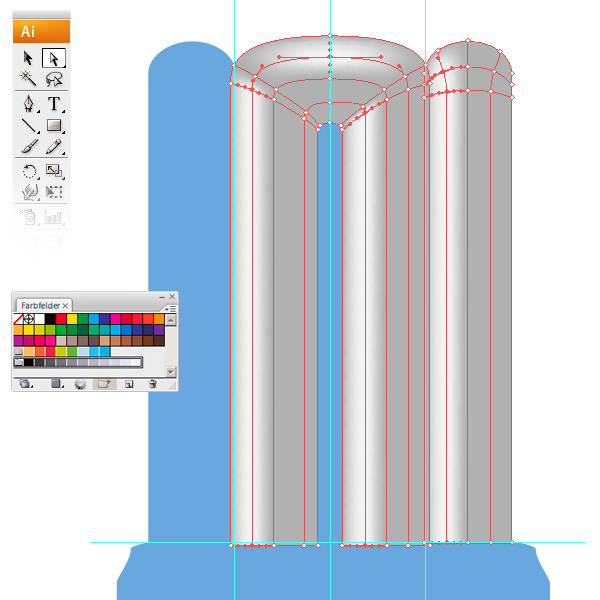
Step 13
This image below shows you how the the final effect should look.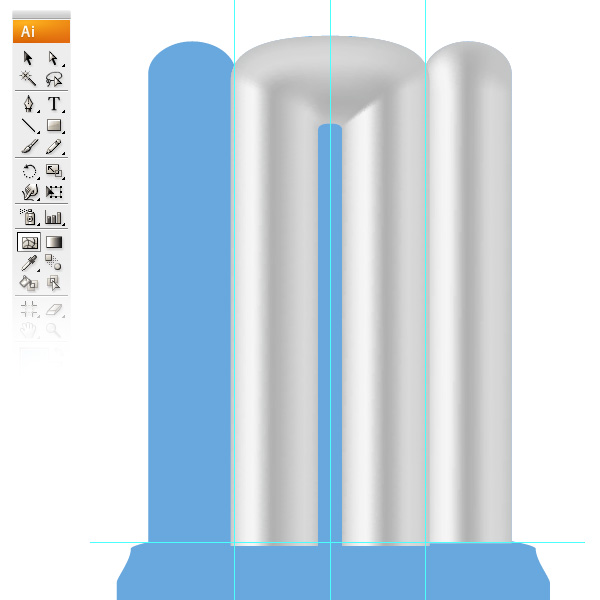
Step 14
Copy your side rod to the other side now.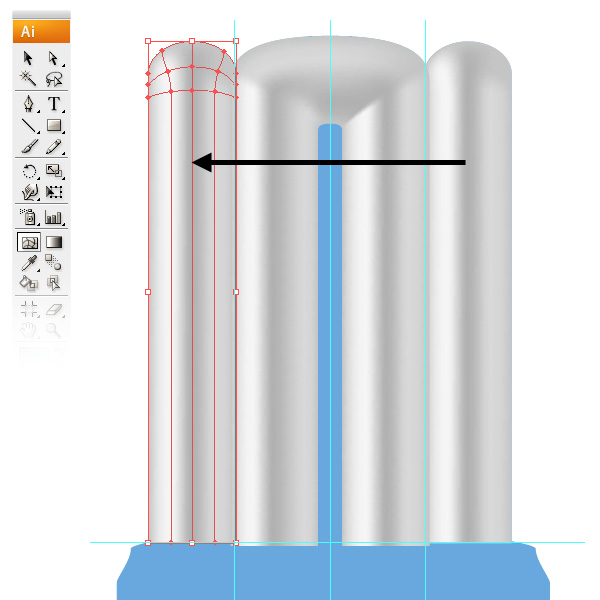
Step 15
The upper part is done. For the lower body you basically have to do the same thing as you did with the rods, just in another shape, which means forming and dividing the mesh shape. So first you place a rectangle to start with.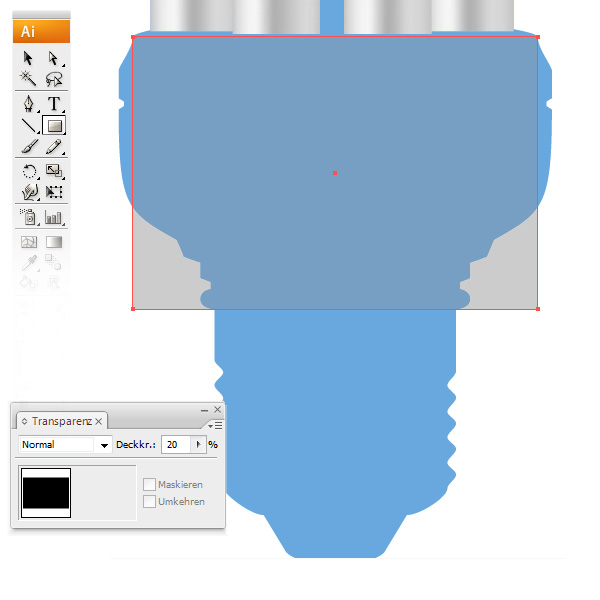
Step 16
Now you divide the rectangle with the Mesh Tool. Make sure that you divide the rectangle by looking at the corners of the main shape.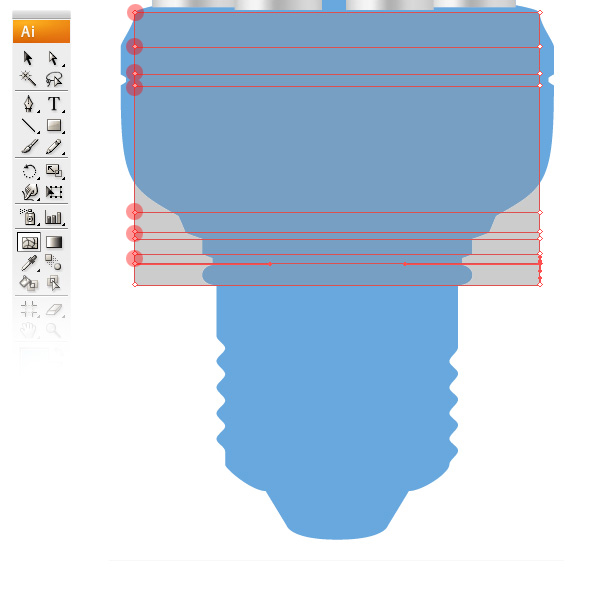
Step 17
Justify the rectangle by using the Direct Select Tool (A) on the main shape, as shown below.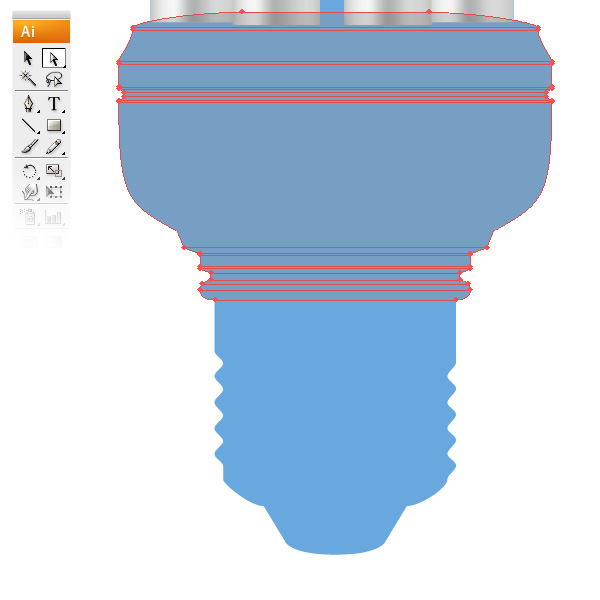
Step 18
Once you’re satisfied with the result of your horizontal divisions, add two vertical mesh lines.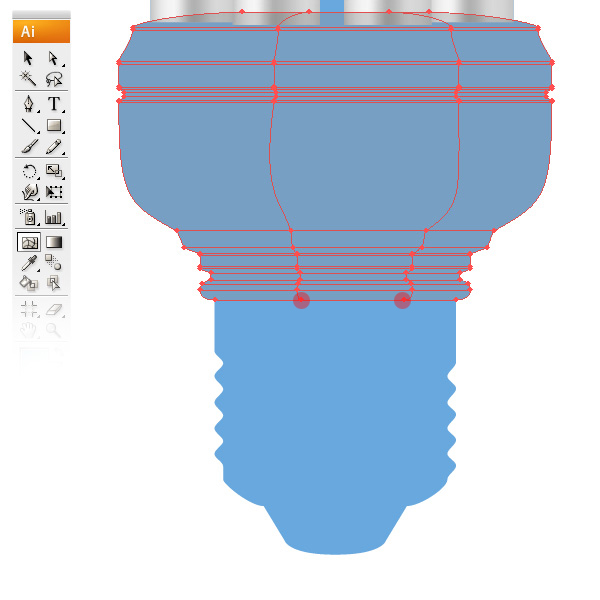
Step 19
Now start adding color to your mesh grid just like in Step 12.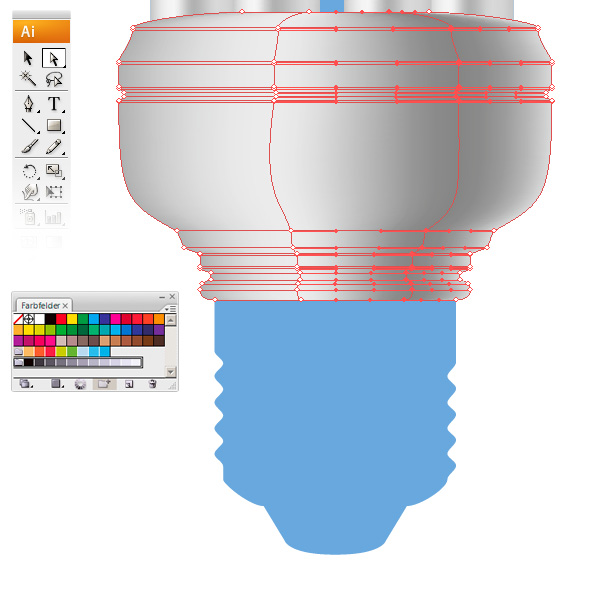
Step 20
Finally it should look like the image below.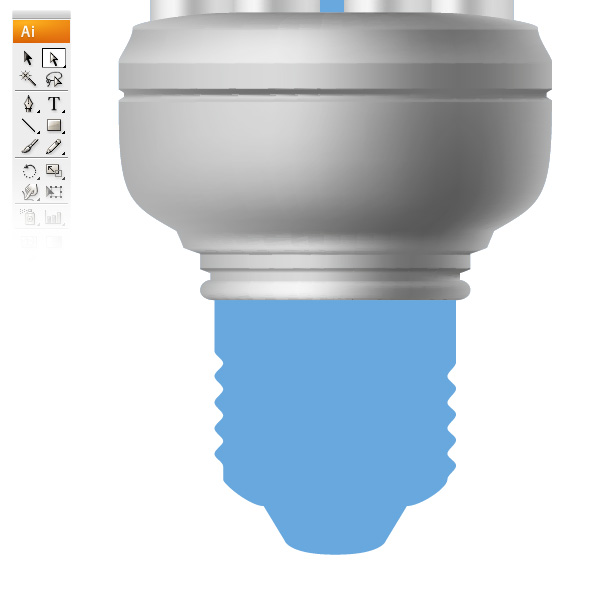
Step 21
Like the last two parts you’ll have to do the same procedure. First draw a rectangle, divide it with the Mesh Tool by observing the main shape. This time, add an additional mesh line over the first division where the thread starts (arrow).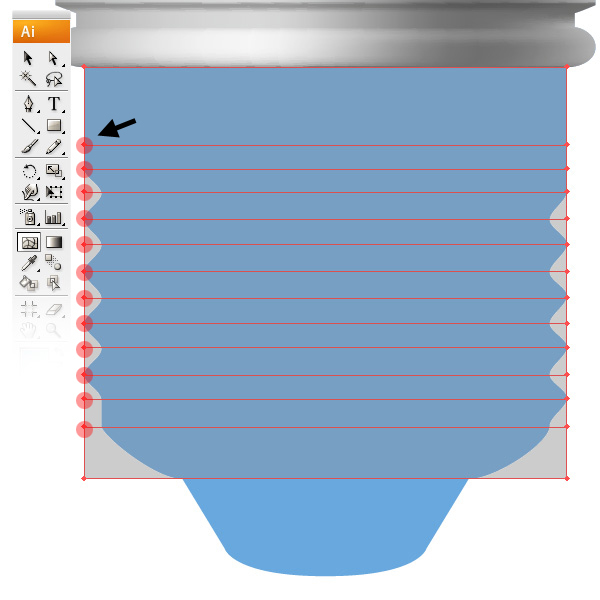
Step 22
Select every second anchor on both sides as shown in the screenshot and scale them down to build the thread.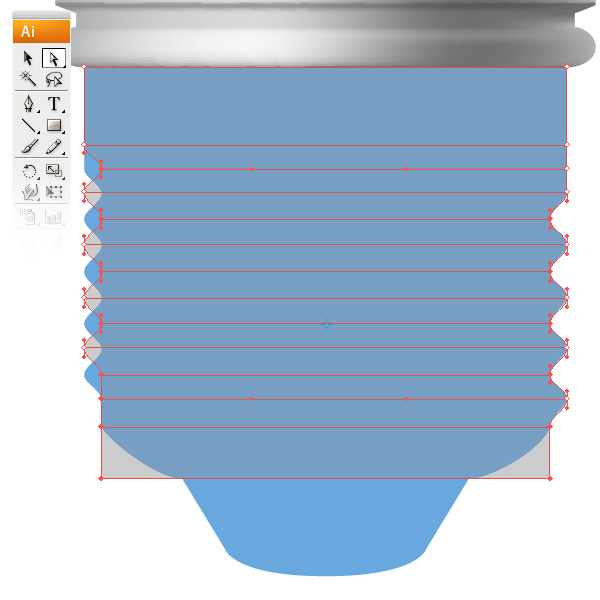
Step 23
Now move the left side down to fit the main shape.
Step 24
Justify the lower left corner to the main shape, add further mesh lines in the thread and divide the shape vertically with seven mesh lines to create a nice metallic effect.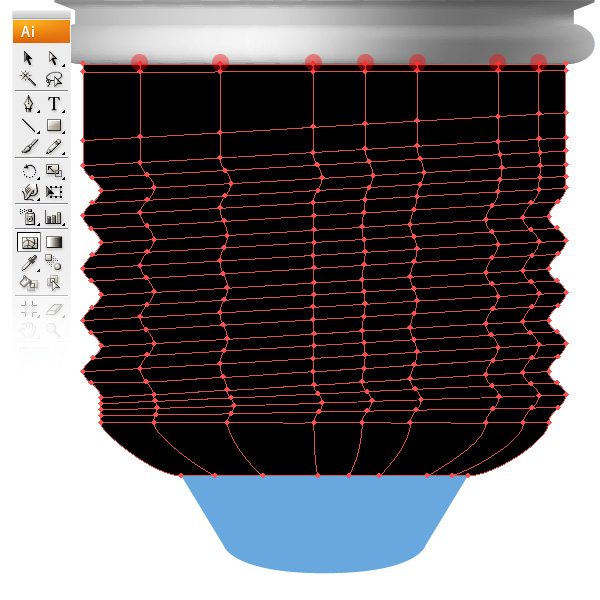
Step 25
When all lines are set, you can start adding color on the vertical divisions. Important: Don’t start coloring horizontally or else you’ll just make it harder for yourself. It should look like the image below after coloring.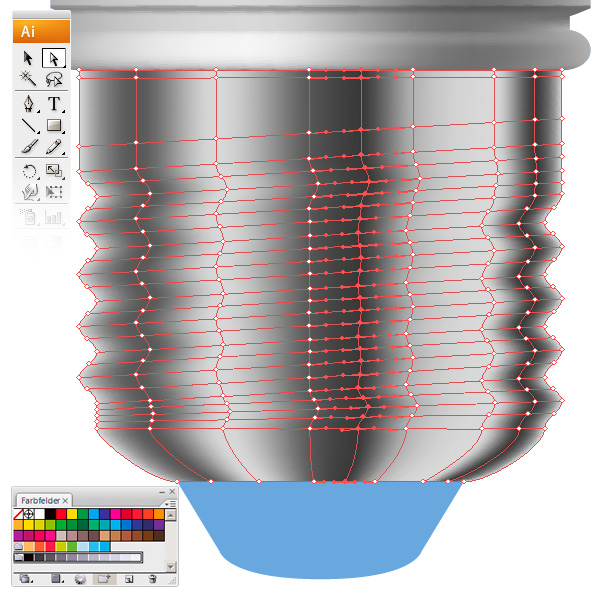
Step 26
Add some dark gray on the darker parts of the thread.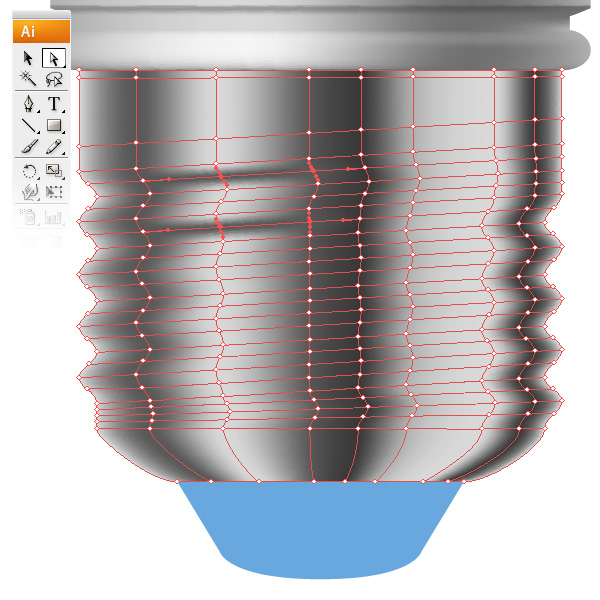
Step 27
Finally it’s supposed to look like the image below.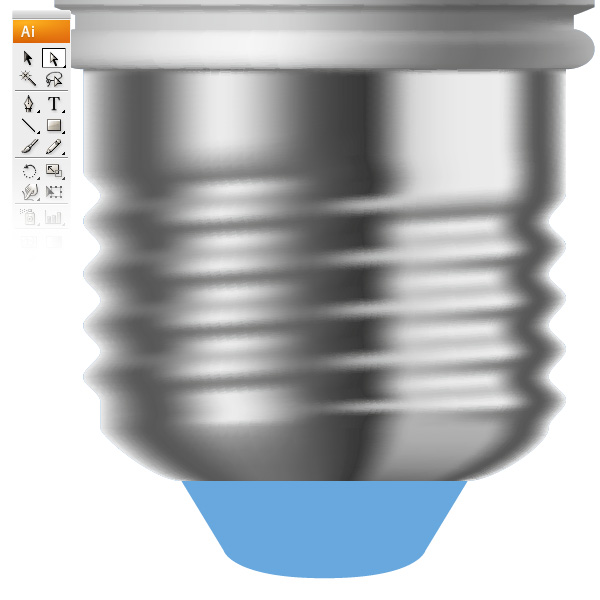
Step 28
Here you just create a simple rectangle, divided it vertically with the Mesh Tool. Afterwards, you scaled the lower part down and formed the curve points into a trapezium.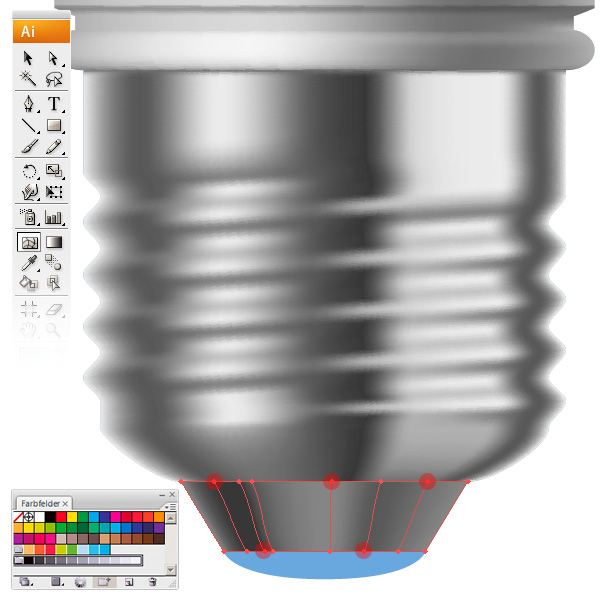
Step 29
For the last step, this is an easy one. Make a circle, cut it in a half, scale it flat and add a linear gradient on it.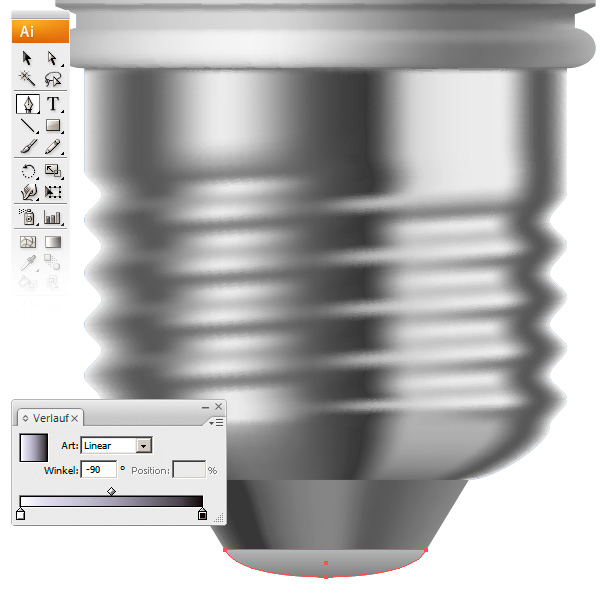
Conclusion
This is the final energy saving bulb. Enjoy!flash.hiperlink
| Introdução O Flash já não é apenas um programa para criar efeitos fantásticos e animações. O Flash também é usado para criar navegações, menus e outras formas de interagir com os utilizadores. Um dos aspectos fundamentais nas navegações são os hiperlinks. Num browser quando damos um clique sobre um link uma página é carregada, mas no Flash as coisas funcionam de forma diferente. Criar um hiperlink não é muito difícil mas requer algum conhecimento de ActionScript. Este tutorial vai-te ajudar a criar hiperlinks a partir do Flash.
Downloads:
Criar um hiperlink Os passos seguintes vão ajudar-nos a criar um hiperlink:
Deves ter reparado que quando clicamos no botão, a página foi carregada numa nova janela do browser. Mas nem sempre desejamos que os links abram numa nova janela. Por vezes queremos que os links abram na janela actual do browser. É neste caso que a opção “Window” é fundamental. Neste Tutorial escolhemos a opção _blank de quatro escolhas possíveis. Agora é altura de termos uma pequena explicação sobre cada uma delas: _self Carrega o link na janela actual do browser. Esta é a opção pré-definada pelo Flash para abrir qualquer link. _blank Carrega o link numa nova janela tal como vimos neste tutorial. _parent Esta opção é especialmente útil quando trabalhamos com páginas que contêm frames. Ao escolhermos a opção _parent as frames são eliminadas e a página passa a ser carregada numa janela normal do browser sem frames. _top Carrega o link na frame do topo. | |||||||||||
| Espero que este tutorial te tenha ajudado. Se tiveres alguma dúvida ou questão, não hesites em utilizar os nossos Fóruns de Discussão. | |||||||||||
| Bons Flashes Paulo Barbosa paulo.barbosa@flashwebtraining.com |


ilustrator.caramel riplle effect

Download Source Files
- Source files for this tutorial are available to Premium members.
Get a Premium Membership
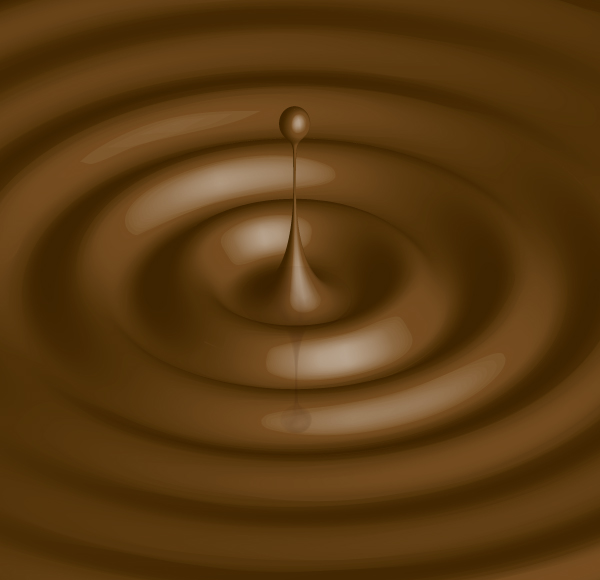
Final Image Preview
Below is the final image we will be working towards. Want access to the full Vector Source files and downloadable copies of every tutorial, including this one? Join Vector Plus for just 9$ a month.Tutorial Details
- Program: Adobe Illustrator
- Version: CS3
- Difficulty: Intermediate
- Estimated Completion Time: 30 minutes
Video Tutorial
Cheryl Graham created this video tutorial to compliment this text + image tutorial.Step 1
Create a new document of approximately 600px by 580px size. Next, with the Line Segment Tool (backslash), draw a line of 600px length and stroke it with CMYK values: C=40, M=65, Y=100, and K=35.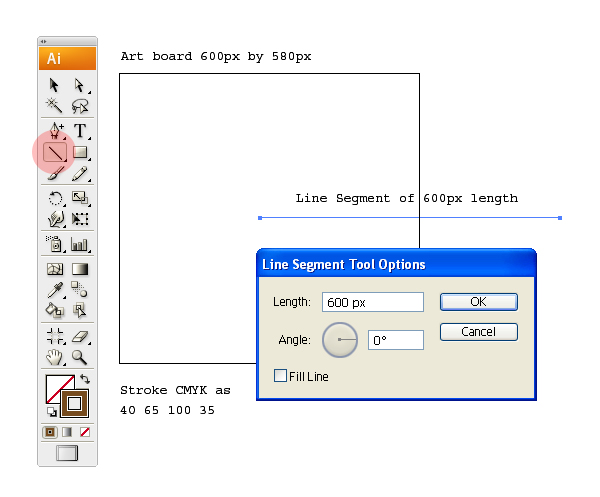
Step 2
Select the line and go to Effect > Distort & Transform > Zig Zag. Enter the values as shown in red below. This will make a wave like effect as seen in liquids.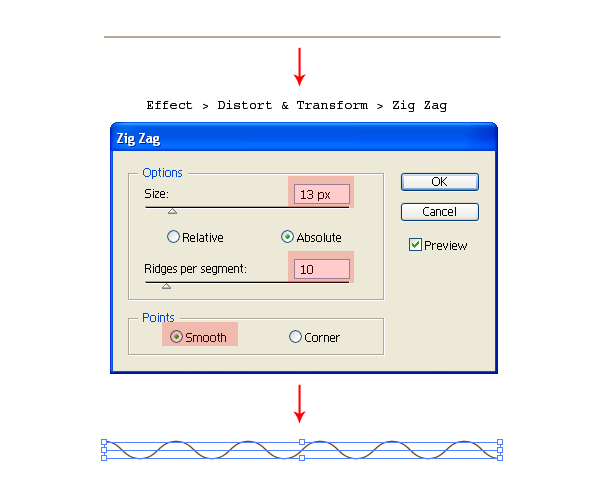
Step 3
The waves generated in a liquid vanish as they move outwards. For this, we will use some distortion. Select the line and go to Object > Envelope Distort > Make with Warp (Alt + Shift + Command + W). In the Warp Options, select the Fish effect with 50% bend. This will make the desired wave with vanishing ends.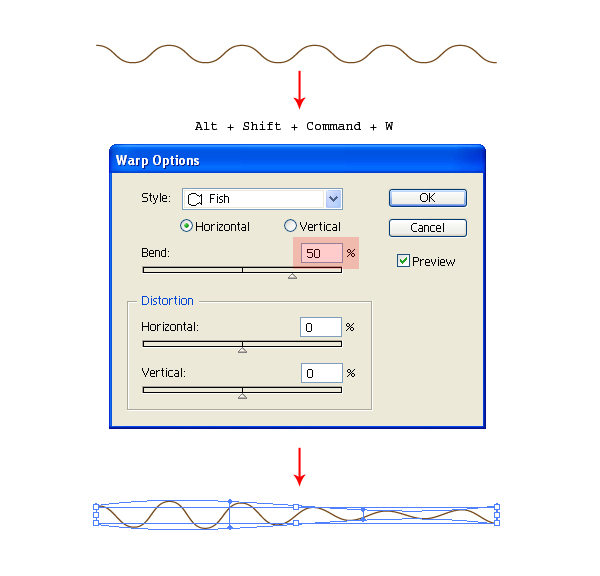
Step 4
Select the wave and expand it using Object > Expand.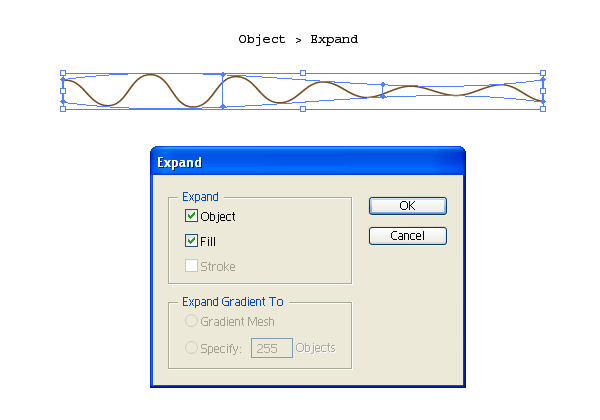
Step 5
Next, we will add a drop bounce effect. With the Direct Selection Tool (A), select the first anchor and drag it upward. With the Add Anchor Point Tool (+), add a couple of anchor points and adjust the handles to get the result shown below. You will see a King Cobra like anatomy. Keep a backup copy of this figure as we will use it later for the reflection.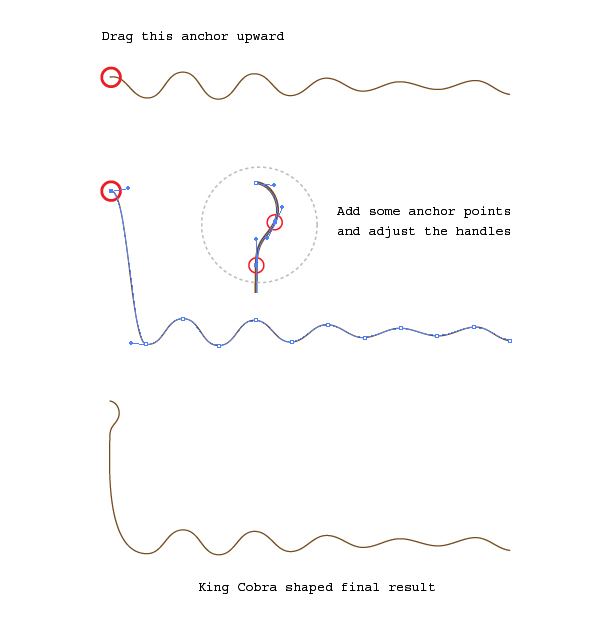
Step 6
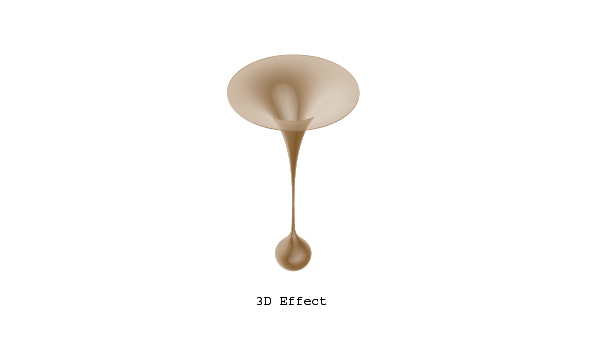
The base for our caramel effect is ready. Next, select the figure and go to Effect > 3D > Revolve. Click on More Options and enter the values as shown in the red regions below.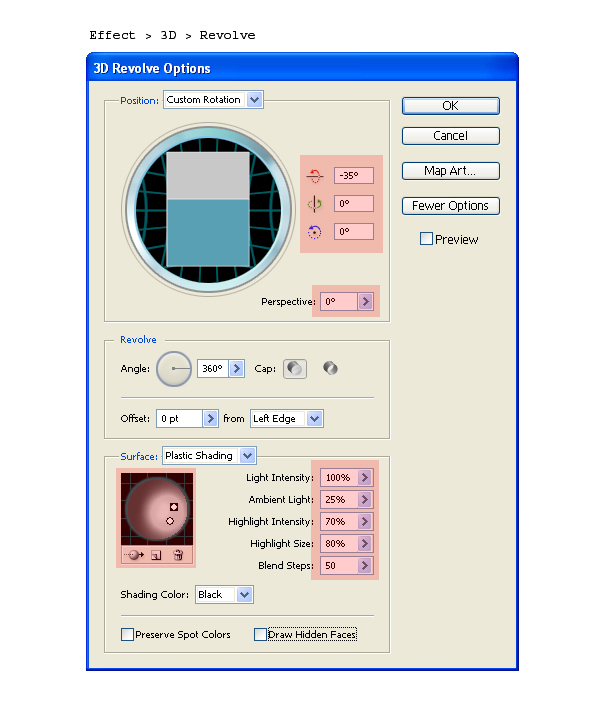
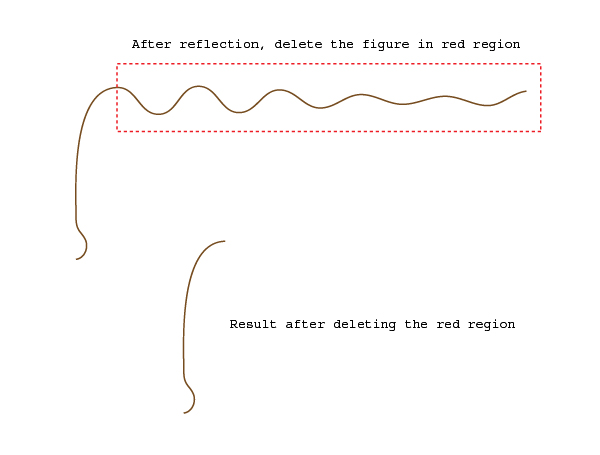
Step 7
Now we will add some reflection to the bouncing drop. Grab the backup copy of Step 5 and reflect it horizontally using Object > Transform > Reflect. Next, delete the region shown in red using the Direct Selection Tool (A).
Step 8
Select the reflected figure and go to Effect > 3D > Revolve. Enter the same values as in Step 6. Change the Shading Color to Custom and assign a white shadow.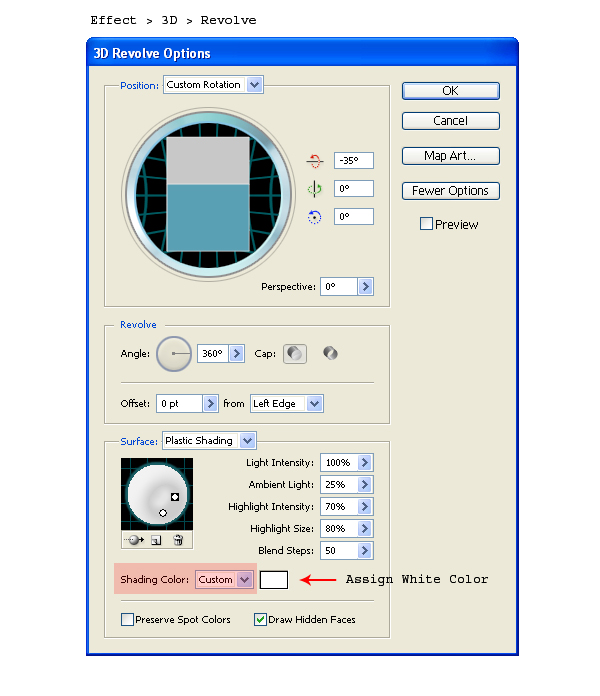
Step 9
Position the shadow graphic in line with the bouncing drop. Next, adjust its Transparency to 20% and reduce its height to match with the perspective of the overall graphic.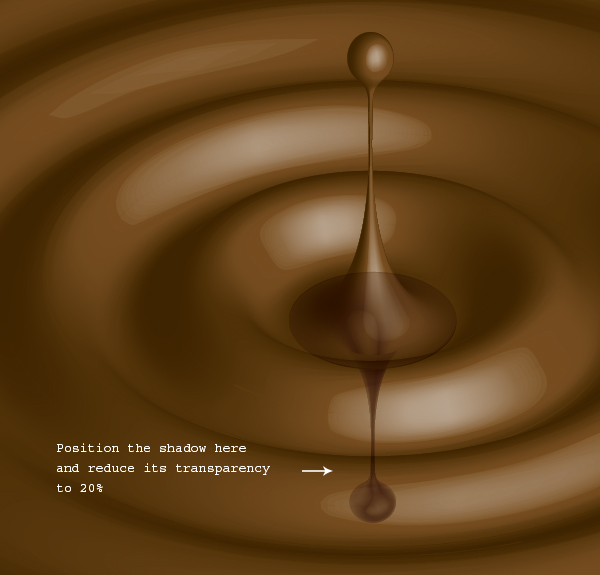
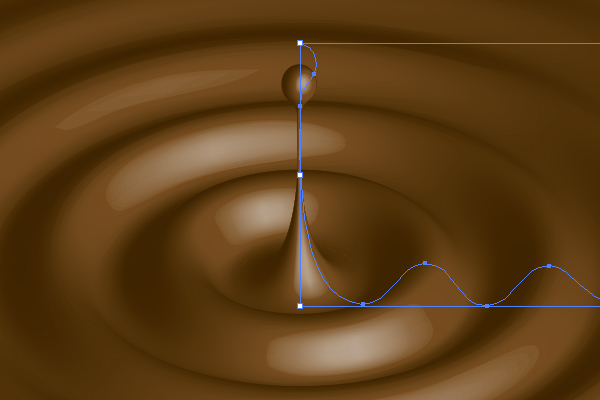
Conclusion and Scope
The techniques covered in this tutorial are an effective use of built in Illustrator Tools. The Zig Zag, Warp and the Revolve Tool yields the ripple effect in less time and effort.Below is a water ripple effect that I have created using the same technique. A mixed use of distort and warp options often yields creative results. We just need to experiment with them. I hope you enjoyed this quick and easy tutorial.