sábado, 31 de dezembro de 2011

posbackup. pave light abacaxi

Pavê light de abacaxi


Essa receita é feita por partes, mas é extremamente fácil, leve e ...uma delícia!
São 3 etapas, a calda, a base e o creme.

Ingredientes:

Para o creme:
Compre no supermercado, um envelope de pudim ou creme sabor baunilha ou leite condensado.

Para a calda:
1 abacaxi médio descascado e cortado em cubos. Eu reservei 4 fatias para decorar no final.
1 colher(sopa) de açúcar ou adoçante
1/2 xícara de água.

Para o bolo:
O bolo, você escolhe qual a melhor opção pra você, fazer em casa, comprar de caixinha ou comprar a massa já pronta : )
Eu fiz tudo em casa, era sábado e eu estava com tempo para me entreter na cozinha, hehe!
Fazendo o bolo em casa:
3 ovos (claras e gemas separadas)
1 xícara de chá de água morna
2 xícaras de chá de açúcar
2 xícaras de chá de farinha de trigo
1 colher de café de fermento em pó

Modo de fazer o bolo:

Bata as claras em neve e reserve
Bata as gemas com a água por 3 minutos, acrescente o açúcar e continue batendo até obter uma mistura bem fofa.
Retire da batedeira, junte a farinha, o fermento e por último as claras misturando delicadamente.
Unte uma forma e leve ao forno médio por 25 minutos ou até dourar.

Ou voce poderá comprar o pao de ló pronto no super ou compre uma caixinha de mistura para bolo sabor baunilha e faça como está orientado na embalagem. Depois de pronto reserve.


Modo de fazer o pavê:

Cozinhe o abacaxi com a água e o adoçante por + ou- 7 minutos. Reserve.
Escolha sua opção de bolo e depois que assou e esfriou, tire toda aquela parte que ficou mais queimadinha, para não deixar um gostinho amargo ao doce.

Pegue o bolo e vá colocando os pedaços picados, "rasgados"  em um refratário ou tigela.


Faça o pudim normalmente como está descrito na embalagem.
Jogue o creme e salpique com o nosso delicioso abacaxi com um pouco de calda.


Mais uma camada de bolo e finaliza com o restante do creme e eu piquei aquelas fatias de abacaxi que tinha reservado e enfeitei, e é claro que não poderia deixar de colocar algumas cerejinhas, afinal de contas elas são lindas!
Rende 20 porções (de 60 gramas), com 115 calorias cada.


posbackup. tortillas mexicanas

Tortillas Mexicanas

   (8 avaliações)    comentar e avaliar receita

Receita indicada por: Larissa A. Galhardo

Share
Tipo de Culinária: México
Categoria: Café da manhã/lanches/festas
Subcategorias: Acepipes & Aperitivos
Rendimento: 15 porções
Ingredientes
1 1/2 xícara(s) (chá) de farinha de trigo
1 1/2 xícara(s) (chá) de fubá
1/2 colher(es) (chá) de sal
3 colher(es) (sopa) de manteiga Mococa
180 ml de água morno(a)
Modo de preparo

Misture os 3 primeiros ingredientes. Junte a manteiga e misture com os dedos, formando uma farofinha. Acrescente a água aos poucos mexendo com o garfo, até formar uma bola. Se necessário, use pouquinho mais de água. Trabalhe a massa por cerca de 5 minutos, amassando até que fique bem homogênea e não grude mais nas mãos. Deixe descansar de 30 a 45 minutos. Divida a massa em 15 bolas e vá abrindo uma por uma, deixando as outras cobertas com o plástico (sempre). Se for fazer tortillas grandes, abra o disco com 18 cm, se for pra canapés mexicanos, corte com a xícara de café (lembre-se, a massa deve ficar fina). Frite as tortillas em frigideira quente: Untever vídeo a frigideira e toste levemente de um lado, vire a tortilla e pressione delicadamente até formarem as bolhas. Vire e aguarde mais 1 minuto. Vire novamente e deixe ela tostar levemente em alguns pontos.

posbackup.cookies integrais de aveia e coco

Cookies integrais de aveia e coco


Fiz esses cookies para comer quentinho, com chá, á tardinha, eu não tinha pão em casa e resolvi fazê-los : ) 
Ficaram bem gostosos e crocantes!

Ingredientes:

1 xícara de farinha de trigo branca
1 xícara de farinha de trigo integral
1 colher de chá de bicarbonato de sódio
1/2 colher de sobremesa de fermento
1/2 colher de chá de canela
100 gramas de manteiga de iogurte (ou uma normal amolecida)
1/2 colher de chá de extrato de baunilha
4 colheres de sopa de leite desnatado
3 colheres de sopa de açúcar mascavo
2 colheres de sopa de adoçante culinário
2 ovos
1 xícara de aveia (em farelo)
5 colheres de sopa de coco ralado sem açúcar

Modo de fazer:

Pré-aqueça o forno a 180°C.
Peneire a farinha, o bicarbonato, o fermento, sal e a canela em uma tigela média.Reserve.
Em outra tigela, adicione a manteiga, o adoçante e o açúcar mascavo, e bata na batedeira, até que fiquem bem homogêneos.

Adicione a baunilha, o leite e os ovos até que fique leve, cerca de dois minutos. Adicione a mistura de farinha, a aveia e o coco ralado.
Coloque colheres da massa em uma assadeira forrada com papel manteiga.
Asse por 12 minutos, ou até que dourem.
Deixe esfriar por alguns minutos antes de remover da assadeira.
Rende aproximadamente 20 cookies grandes.
Prontinho! agora é saborear essas belezuras!


posbackup.bolo light especiarias


Ingredientes

  • 2 xícaras (chá) de farinha de trigo
  • 1 colher (chá) de bicarbonato de sódio 
  • 2 colheres (chá) de especiarias em pó (canela, cardamomo, noz-moscada e gengibre)
  • 2 ovos médios 
  • 5 colheres (sopa) de creme vegetal light sem sal 
  • 6 colheres (sopa) de adoçante em pó para forno e fogão 
  • 11 colheres (sopa) de cobertura light sabor chocolate 
  • ½ xícara (chá) de leite desnatado
  • 30 g de raspas de chocolate branco

Modo de Preparo

Peneire em uma tigela a farinha de trigo com o bicarbonato e as especiarias. Reserve.
Disponha na tigela da batedeira as gemas, o creme vegetal (reserve 2 colheres das de chá) e o adoçante. Bata por 2 minutos. Sem parar de bater, incorpore 6 colheres (sopa) cobertura de chocolate misturada com o leite e bata até ficar homogêneo. 
Junte, aos poucos, os ingredientes secos peneirados, mexendo com delicadeza. Por fim, misture cuidadosamente as claras em neve.
Com o creme vegetal reservado unte uma assadeira com furo no meio (capacidade para 750 ml). Despeje a massa e leve ao forno preaquecido em temperatura média (180ºC) por 30 minutos ou até que enfiando um palito no bolo ele saia limpo. Retire do forno.
Ao amornar, desenforme o bolo em um prato, disponha o restante da cobertura de chocolate e as raspas de chocolate branco.

posbackup.pao de especiarias


Ingredientes

  • 25 colheres de sopa de açúcar mascavo (250 g)
  • 200 ml de leite (14 colheres de sopa)
  • 03 xícaras cheias de farinha de trigo (400 g)
  • 1 e 1/2 de chá de fermento químico em pó (15 g)
  • 02 ovos inteiros branco tipo extra
  • 1/2 colher de sopa de mel de flor de laranjeira (10 g)
  • 01 g de canela em pó
  • 01 g cravo em pó
  • 01 g de anis estrelado
  • 01 g de noz-moscada em pó

Modo de Preparo

Aquecer o leite, o anis estrelado e o açúcar mascavo até que este último se dissolva.
Na batedeira, misturar o mel, as especiarias (com exceção do anis) e os ovos.
Jogar o leite com o açúcar (tomando o cuidado para retirar o anis) aos poucos, na mistura da batedeira, batendo com o globo lentamente.
Misturar a farinha de trigo peneirada, aos poucos, sem parar de bater.
Por último, misturar o fermento com a batedeira desligada.

posbackup. Pao. Wrap

  • Ingredientes
  • 1/2 kg de farinha de trigo
  • 4 colheres (chá) de sal
  • 4 colheres (chá) de açúcar
  • 6 colheres (sopa) de manteiga
  • 1 tablete (15 g) de fermento biológico
  • 1 clara
  • Modo de Preparo
  1. Peneire a farinha, junte o sal, o açúcar, 4 colheres de manteiga, o fermento, a clara e 1 xícara (chá) de água morna
  2. Bata na batedeira em velocidade média, até a massa ficar homogênea
  3. Divida a massa em 14 partes iguais, faça bolinhas e embrulhe-as com filme plástico
  4. Deixe descansar por 25 minutos
  5. Em seguida, coloque a massa numa superfície enfarinhada
  6. Abra cada uma das bolas com um rolo de macarrão, ou uma garrafa de vidro esterilizada, até obter uma espessura de aproximadamente 1 mm e 29 cm de diâmetro
  7. Com a manteiga restante, unte 4 assadeiras
  8. Disponha as massas e leve ao forno por 20 minutos
  9. A massa deverá ficar levemente firme e não deverá dourar
  10. Assim que retirar as massas do forno, guarde-as, uma a uma, em saco plástico, próprio para alimentos, para não perder umidade
  11. O pão pode ser guardado em geladeira 1 a 3 dias
  12. Deixe a massa enrolada no saco plástico e retire somente antes de usar
  13. REcheie a gosto, enrole e aqueça no forno
  14. aTENÇAO, no forno deixe so cinco inutos, senao opao endurece enao dá pra dobrar, (de um leitor dessa receita, pode variar dependendo forno de 05 a 10 minutos,)
    Informações Adicionais
  1. Sugestões de recheio:

    Queijo prato, presunto, alface, tomate e maionese.

    Frango desfiado, azeitonas, maionese.
    WRAP DE PEITO DE PERU E ESPINAFRE

    Ingredientes

    • 2 xícaras (chá) de folhas pequenas de espinafre lavadas
    • 1 tomate fatiado fino
    • 1 cenoura pequena ralada grossa
    • 4 colheres (sopa) de requeijão cremoso
    • 1 colher (sopa) de azeite
    • ½ colher (sopa) de suco de limão
    • 80 g de peito de peru defumado fatiado fino
    • 1 colher (sopa) de sementes de girassol torradas e picadas grosseiramente
    • 2 pães pita ou pão próprio para wraps

    Modo de Preparo

    Em uma tigela, misture o espinafre, o tomate, a cenoura, o requeijão, o azeite e o suco de limão. Junte o peito de peru e a semente e tempere com sal. Aqueça o pão em um forninho, por 1 minuto de cada lado, sem dourar. Corte ao pão ao meio e divida o recheio entre as metades. Enrole como wrap e sirva.


      sexta-feira, 23 de dezembro de 2011

      posbackup.hdr photoshop

      0 (Intro)

      In this tutorial we will take a look at HDR photography. HDRI (High Dynamic Range Imaging) was originally used in 3D and is now in full force in photography. Basically it's the process of taking multiple exposures and merging them together into a single 32 bit image. Let me explain: A camera is capable of capturing a limited amount of tones in a single photo. Typically we sacrifice elements in a photo when we press the shutter. For example there is a powerful cloudscape and some cliffs. If we expose for the clouds the cliffs become dark. If we set the camera's exposure to capture detail in the cliffs, the brighter sky is blown out and detail is lost. This is because the human eye can see a larger range of tones than the camera can capture on the chip or film in a single photograph.

      The solution is to take more than one photograph and bracket the photos. Shoot normal exposure, then under-expose a shot to capture highlights and over-expose a shot to capture shadow detail. Finally, merge these photos together to produce a single image with a larger range of tones that can now show all the details in the shadows and highlights. This tutorial will show you how to complete this process with the minimum fuss.
      First we need to get our source images. (You could begin with a 32 bit 3D image and then skip to step 6). Typically we will capture these with our camera. You will need to shoot a minimum of 2 photos with different exposure settings.
      Its been recommended by Adobe to limit the bracketing by 1 stop and this will help reduce banding. You may also take 5 or more shots with a smaller gap in the bracketing. I personally get good results from 3 shots. I like to over expose and under expose by 2 stops. I know this is a bigger bracket than most people are comfortable with, but for the type of HDR images I like to create (cityscapes), this works great. If your shooting people, you may want to reduce this to even 3rd stops.

      (Note: You can't use a single raw image and exposure it several times as some people suggest, for a true HDR photo. This is known as pseudo-HDR. Photoshop will not allow you to merge these because there isn't sufficient tone detail captured).
      For more details see the new video HDR and Photoshop

      1

      Start with 3 images. One normal exposure, the second underexposed and the third overexposed. In this case I used 2 stop bracketing. As I shoot a lot of city scapes I can get away with 2 stops, because I'm mainly shooting flat surfaces and banding and posterization isn't such a problem. If your shooting rounded and curved surfaces you will want to lower your bracketing to get smoother gradients.
      I set the bracketing on my camera to 2 stops. Then I set the shooting mode to burst. When I hold the shutter down, 3 photos will be captured. I shoot in RAW mode for the widest possible dynamic range. You can still create HDR if your camera doesn't support RAW. Make sure you shoot in Aperture Priority or in Manual. You want to bracket the exposure time, not the Aperture. If you change the aperture, the depth of field won't be consistent and you'll get blurring. Also avoid any moving subjects in the photo or you'll get ghosting.
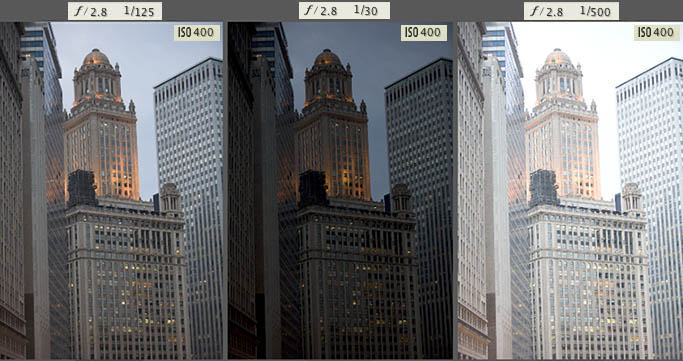
      2

      Time to merge the photos together into a single 32 bit image.
      Choose File>Automate >Merge to HDR. This works on Photoshop CS2 and CS3. (CS2 Doesn't have auto align). Choose either images or folder. I organize each set of photos in its own folder so I used the folder option. Select your photos to merge. Turn on Auto Align in Photoshop CS3. Click OK. (Photoshop CS3 uses new Auto-align technology that even allows you to create HDR without the use of a tripod!)
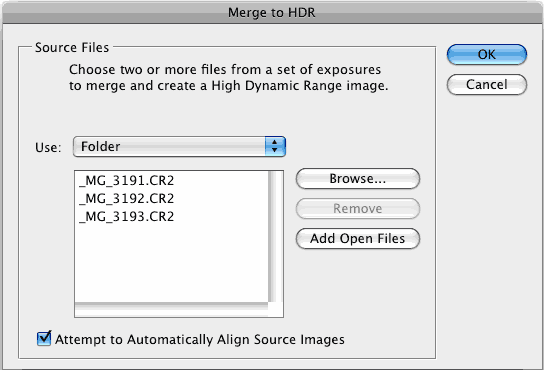
      3

      Your images will now be merged into a single photo. You can turn off individual photos by un checking their boxes on the left filmstrip. If you get some blurring caused by camera shake in the longest exposure, you may want to turn off that photo.
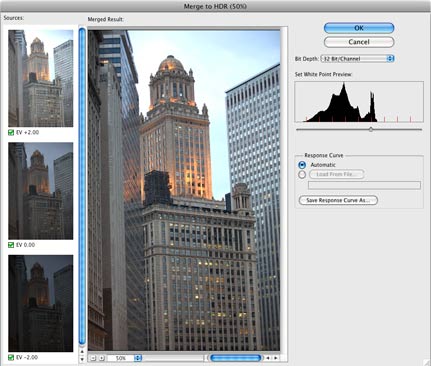
      4

      The merged result is a floating-point 32 bit image. You can adjust the overall tones by sliding the White Point slider. Easy with it, a little movement goes a long way!
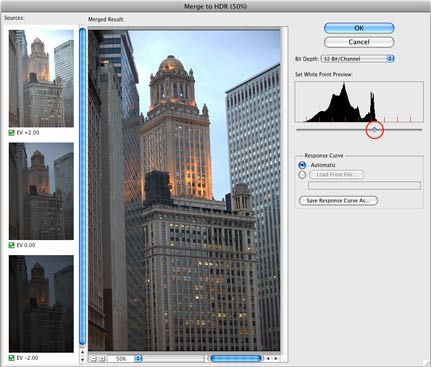
      5

      Click OK to merge the photos into a 32 bit image. Now is a good time to save your file.
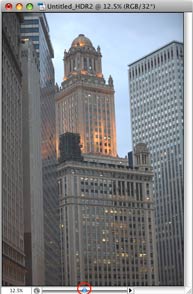
      6

      In order to use the photos, you'll need to convert them t 16 or 8 bit images. When we convert them we will create what I call interpretations of the photo. The reason I say this is because we have unlimited ways we can make the photo look. While we have this huge dynamic range available in 32 bit, we will no longer have those options after conversion. Always work from the saved 32 bit version, and then convert and save versions (personal interpretations). Avoid overwriting the 32 bit image, it's our master and we may want to go back to it many times.
      Choose Image>Mode>16 bit (or 8 bit). Now we get to play with some fun options. You're now at the tone mapping part of the process. This is were all the creativity can ooze.
      (If you want to make the adjustments without converting, choose view>32 Bit Preview Options. You can use several of Photoshop's tools in the Image>Adjustments menu. The most important of these is the Exposure control)
      You'll see an HDR Conversion Dialog box. Exposure and Gamma is the default option. Best way to approach this? Set the gamma first, then adjust the exposure to suit. If you want an image with lots of contrast, lower the gamma. For less contrast raise the gamma. Finally, adjust the exposure to get the desired brightness. If you want more control, read on... otherwise press OK to convert.
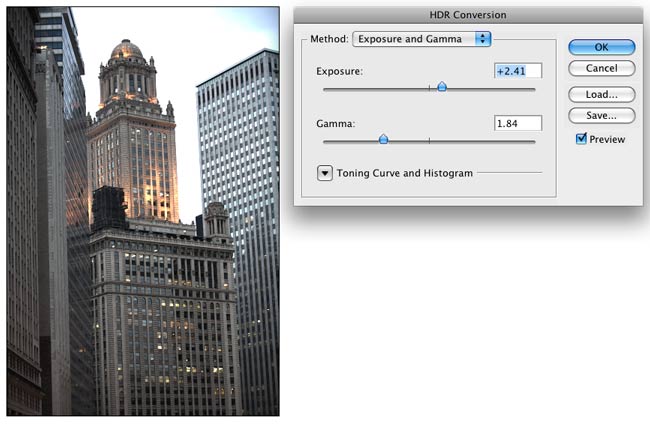
      7

      Change the Method to Local Adaption. (There are 4 available methods, but these are the only 2 with user input).
      With local Adaption, you can adjust the curves. Set these like you would normally work in curves, but don't be afraid to clip the histogram a little. You can clip because your working with a larger dynamic range than you're used to. Bring out the detail in the image, but don't forget to put some shadow in there or it will look washed out and fake. Once your happy with the curve, adjust the radius and Threshold sliders to make sure there are no halos in the photo. (Badly converted HDR images have a glow around the areas of contrast.) The radius controls the mask blur while the threshold decides what gets blurred and what doesn't.
      Click ok to convert.
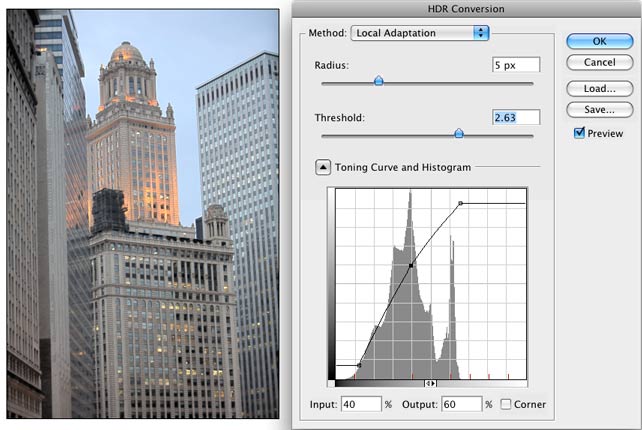
      8

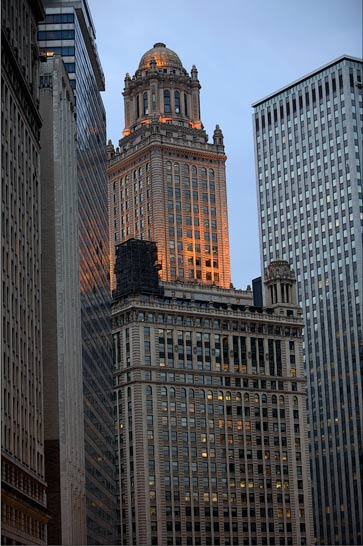
      Here we have a merged image from HDR. The second image is a variation. In the second variation, I applied exposure, curves and sharpening settings while in 32-bit mode (Highlight Compression Method). Photoshop is great for producing very realistic HDR images.
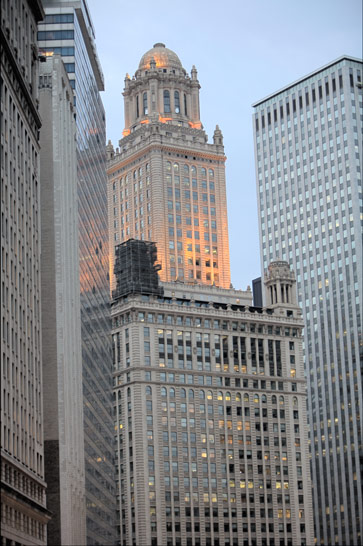
      9

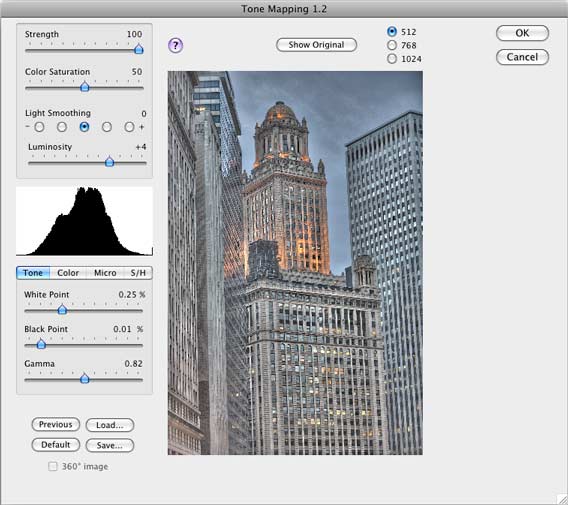
      If your desiring a more surreal result there are different plug-ins that you can use. My favorite is Photomatix pro from HDRsoft. You can just get the tone mapping plug in for Photoshop which works great. Use the coupon code photoshopcafe to save 15%.
      Using photomatix tone mapping plugin allows you to get highly detailed textures in your photographs. You merge in Photoshop as shown in this tutorial. Then choose Filter>Photomatix to apply tone mapping. Convert and save as normal.
      10

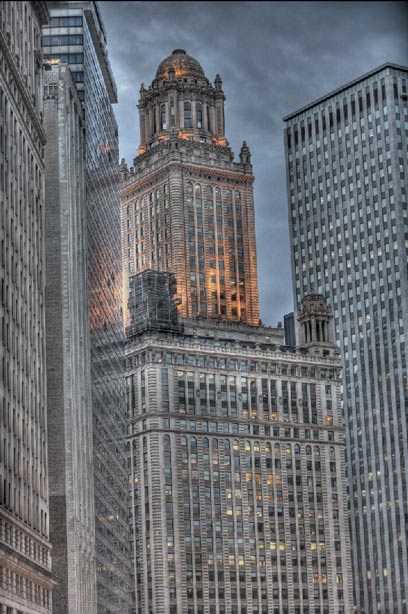
      This image shows an image after tone mapping using Photomatix pro.
      11

      Here you can see comparisons between a single image, subtle Photoshop HDR and a radical Photomatix effect (Click for larger image). Whatever result your after, hopefully this tutorial has helped demystify the HDR process.

      12
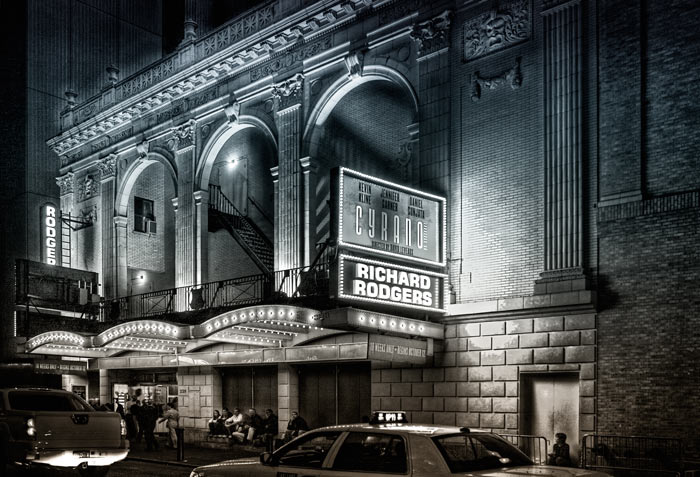
      Here is another HDR shot of mine. This is a night scene converted to grayscale.
      I hope you enjoyed this tutorial!
      Colin

      Extra Resources


      Click here to see more examples of my HDR or check out my flickr page.

      See the new video by Colin Smith HDR and Photoshop

      Photomatix pro from HDRsoft. Use the coupon code PhotoshopCAFE to save 15%.
      List of Auto Exposure bracketing by camera

      HDR and PhotoshopCheck out the brand new video on HDR. 2.5 hours of training.
      HDR and PHOTOSHOP by Colin Smith

      quinta-feira, 22 de dezembro de 2011

      posbackup.pint,digtal.photo.dino atacck

      Making Of 'The Confrontation'

      By Jone L. Leung

      | Your Rating:
      starstarstarstarstar
      (8 Votes)
      | 3087 Views
      | 1 Comments
      | Comments 1
      Date Added: 29th September 2011
      Software used:
      Photoshop
      1
      1243_tid_image_12_final_image.jpg

      Step 1

      Hello, for this making of, I will try my best to backtrack the steps that I took to complete my image, The Confrontation. I've always been inspired and fascinated by dinosaurs and prehistoric creatures, so for this painting, I wanted to create an adventure based fantasy piece. With that idea in mind I started off with a simple line drawing, just to get the pose, gesture, expression, and anatomy of the dinosaur. Keep in mind that since this is a personal piece, I didn't bother doing any thumbnails or pre-planning, since I had everything pretty much in my head and just wanted to start painting as early as possible. Needless to say, skipping this process did present me with a couple of roadblocks along the process so do keep in mind that thumbnails and idea sketching are crucial especially if your work is for a client. Also doing multiple thumbnails gives you more options to choose from, whether for yourself or for a client. I wasn't too sure about the composition at this stage because of my rush to jump right in, and it caused me to go in circles, so a great way to avoid this and save time is to simply give your-self more options in the beginning (Fig.01). The brush that I used to do most of the preliminary drawing is basically a default round brush built into Photoshop as shown in Fig.01a. The settings are pretty basic, and I find that this brush is fairly versatile at this stage to lay down ideas and make quick changes.

      1243_tid_image_01_sketch.jpg
      Fig. 01

      1243_tid_image_01a_brush_preset.jpg
      Fig.01a

      Hair&Face


      Step 2

      In this step, I felt that his expression wasn't really what I had in mind. I wanted the beast to be more aggressive and meaner, so I gave him an opened mouth as part of my idea was to have it growl at his newfound prey. The dinosaur itself is not anatomically accurate, being that I wanted some creativity and artistic ownership rather than copy a real dinosaur. It was more fun for me that way. (Fig.02)

      1243_tid_image_02_sketch.jpg
      Fig.02

      Step 3

      At this point, I decided on most of the composition, placing the figure on the far upper left corner on top of these giant banyan roots that I wanted to incorporate into this piece. The roots are enormous and marvelous structures, and if you've seen them in person you'll know what I'm talking about. What I want to show is basically a square-off between man and beast, so at this stage I was deciding on the placement mostly, and how to integrate forest elements into the painting without causing tangents that will disturb the "flow” of the image. (Fig.03)

      1243_tid_image_03_layout.jpg
      Fig.03

       
      1 | 2 | 3 | 4
      Making Of 'The Confrontation'

      By Jone L. Leung

      | Your Rating:
      starstarstarstarstar
      (8 Votes)
      | 3088 Views
      | 1 Comments
      | Comments 1
      Date Added: 29th September 2011
      Software used:
      Photoshop

      Step 4

      The early composition did involve observant monkeys hanging on trees if you look closely at the upper right hand corner, and for some odd reason, this idea crossed my mind that another figure should be sort of riding the beast, or controlling its actions. That really didn't go over too well, since the scale of the painting meant that the dinosaur would be gigantic, thus making its surroundings more detailed than what I wanted to show. Another decision that was made was to crop the left side of the image so that there would be less space between the man and the beast, because I wanted a more dramatic feel. At this point, I'm still using the default round brush and painting in black and white. (Fig.04)

      1243_tid_image_04_skecthing_layout.jpg
      Fig.04

      Richard_Tilburys_Mountain_Stronghold

      Step 5

      It was then time to throw down some color, and to indicate general forms and shapes. Using a combination of multiply, overlay, screen, and soft light, I gave some starting base colors to the forest, dinosaur, and the figure. These layer modes are useful for laying in basic colors without covering up the line work. If you think in line like I do, this technique is extremely helpful. Depending on how you think, you may prefer starting off with line art or you may choose to immediately use solid color to block in shapes, masses, and just go nuts. Either way is fine, it is all a matter of comfort and finding whatever method works in your favor. For me, I find it easier to conceptualize and see things in line. (Fig.05)

      1243_tid_image_05_block_colour.jpg
      Fig.05

      Step 6

      Using a few layers to build up the colors gradually, I continued to push some of these base colors in order to make the image pop more. I was going for a late afternoon, early evening atmosphere, so I wanted everything to have a dark blue-green tinted overcast, with a primary focal area bit brightly defined and lit. For now, it seems to be where the dinosaur is standing. The colors are quite saturated right now, but that will be changed later on.  Also, I decided to change the rock on the left and add some trees in front of and behind the dinosaur in order to define this environment a bit further. (Fig.06)

      1243_tid_image_06_colour_tones.jpg
      Fig.06

       
      1 | 2 | 3 | 4
      Making Of 'The Confrontation'

      By Jone L. Leung

      | Your Rating:
      starstarstarstarstar
      (8 Votes)
      | 3089 Views
      | 1 Comments
      | Comments 1
      Date Added: 29th September 2011
      Software used:
      Photoshop

      Step 7

      This step is a bit of a jump I know, but from here on out it was a process of straight forward painting. Just a lot of time and trying to find what I want within the picture. Many additions such as clothing on the figure, details in the rocks, leaves, and trees that helped the image come together. I made the dinosaur much bigger, to heighten the effect of the narrative. Sometimes you just have to push paint or in this case pixels around until whatever it is you want starts to unfold. Another pointer that helps is to really observe what you want to illustrate. Try to understand what it is you're drawing or painting from a color, form, and shape standpoint (Fig.07). Sometimes it's not just about replicating what is in front of you. Several custom brushes were made from scratch in order to make the textures a little more personal, in order to get away from the traditional round brushed look that Photoshop has, nothing against that look since I myself do it like that sometimes, but I wanted something that felt more organic. Many different brushes can be variations of the chalk brush built into the program, tweaked with either shape dynamics, texture or the dual brush options checked on or off. So have fun and just play around with it. (Fig.07a)

      1243_tid_image_07_detailing.jpg
      Fig.07

      Matte_Painting

      1243_tid_image_07a_brushes.jpg
      Fig:07a

      Step 8

      More painting. Here I added indications of scaly dinosaur skin, and brightened the focal area a bit more. The image overall has a warm overtone to it, something that I don't want so I will fix that later. (Fig.08)

      1243_tid_image_08_small_detailed_brush.jpg
      Fig.08

      Step 9

      Here, I decided to brighten the dinosaurs head as well as provide some sort of ambient lighting to the rest of the ground plane that surrounds the focal area. An overlay layer with a light de-saturated color was applied over where I wanted the light source to be. It's important not to overdo this, since it will look really cheesy and obvious if not done with care. I also glazed over the edges around the painting with a darker color set to multiply in order to frame it, bringing out the composition even more. Doing this allows the viewer to distinguish more clearly where I want their focus to be drawn. (Fig.09)

      1243_tid_image_09_effects.jpg
      Fig.09
       
      Making Of 'The Confrontation'

      By Jone L. Leung

      | Your Rating:
      starstarstarstarstar
      (8 Votes)
      | 3090 Views
      | 1 Comments
      | Comments 1
      Date Added: 29th September 2011
      Software used:
      Photoshop

      Step 10

      This is where I made a major change. Previously, I felt the key color to be a little too warm and reddish for my liking, and so I decided to apply color balance and curves adjustment layers over the entire painting. You'll notice that after this was done, it resembles closely the final image. These layer modes are great in a sense that it can allow you to sit back and choose what you do and do not want. Keep in mind that it takes several passes to get to the results that you want and it is by no means a quick fix. It still takes an understanding of lighting, and color to make it work. Photoshop may make an artist much faster, but that doesn't necessarily translate you into a better artist. Additionally, these solutions offer much more flexibility compared to the traditionally approach of painting over it, although that wouldn't be too bad either. Maybe, someday I'll choose to do an entire digital painting on one layer without using any of the options available. Right now that sounds scary but that will be fun and challenging. =) (Fig.10)

      1243_tid_image_10_colour_saturation.jpg
      Fig.10

      Step 11

      More painting done here again. I noticed the dinosaur's leg didn't feel integrated so I decided to cover it up with some long grass. Also, I felt the figures shirt was too bright so I went ahead and darkened that area too. (Fig.11)

      1243_tid_image_11_fine_details.jpg
      Fig.11

      Speed_Painting_V3

      Step 12

      I decided that the dinosaur needed something to make it a bit different so I went ahead and painted in some horns on its back and head region. I continued to add details here and there, without zooming in too much in order to have a complete view of the picture. Zooming in too frequently can make one lose attention to how the entire image is working out as a whole. The painting up close is actually quite chaotic and loose. I applied some backlighting to the figure as well, reflecting some of the local colors from the surroundings. From here on out it just became a process of nitpicking, changing and adding details, micro-composing certain areas so that tangents don't occur, and darkening and brightening specific areas to make it pop out more. That's about it I guess. Hopefully this made some sense and it helped you picked up a thing or two. Feel free to shoot me an email if anything seems confusing. If you know another way of doing things, I'd love to learn. Thanks for reading!(Fig.12)

      1243_tid_image_12_final_image.jpg
      Fig.12


      1 | 2 | 3 | 4